Create Modules
At this part, we have done most of the setup, now we will mostly code.
From our ER diagram, we have 3 modules, let’s create those modules in the most scalable way.
The User Module
We will use the Nest CLI to generate our modules, let’s start with the user module, by running the code below at the root of our project
# generate the user module
# to the question 'What transport layer do you use?' choose GraphQL (code first)
# to the question 'Would you like to generate CRUD entry points?' reply with y
$ cd src/app && nest g resource user
Wow 🤩 , Nest has done all the heavy lifting for us by providing a solid foundation for our user resource! This is incredibly powerful and allows us to focus on the implementation rather than worrying about architecture or any other complex issues. How amazing is that! Is our app still working? Of cause, Nest is our biggest friend, he can’t break it.
Take a few moments to have a look at the generated files, as we start customizing those files.
As we have generated the CRUD entry point, after running the app, we can see that our
schema.gqlfile is updated to something like the following(code-first):# ------------------------------------------------------
# THIS FILE WAS AUTOMATICALLY GENERATED (DO NOT MODIFY)
# ------------------------------------------------------
type User {
"""Example field (placeholder)"""
exampleField: Int!
}
type Query {
getHello: String!
users: [User!]!
user(id: Int!): User!
}
type Mutation {
createUser(createUserInput: CreateUserInput!): User!
updateUser(updateUserInput: UpdateUserInput!): User!
removeUser(id: Int!): User!
}
input CreateUserInput {
"""Example field (placeholder)"""
exampleField: Int!
}
input UpdateUserInput {
"""Example field (placeholder)"""
exampleField: Int
id: Int!
}We have a folder called
dto/under our generateduserresources directory which holds our DTO (Data Transfer Object) files. A DTO defines how data is sent over the network. We can define the DTO schema using TypeScript interfaces or classes. Nest documentation suggests using classes over interfaces as they are part of the JavaScript ES6 standard and will be preserved as real entities in the compiled JavaScript. TypeScript interfaces, however, are removed during transpilation, making them inaccessible to Nest at runtime.You'll notice that Nest has automatically generated these queries and mutations for us. Now, let's customize the user resource files to suit our needs.
We'll begin by modifying the
app/user/entities/user.entity.ts**** file to define our user model. Replace the existing code with the code provided below:import { ObjectType, Field } from '@nestjs/graphql';
import { Document, Schema as MongooSchema } from 'mongoose';
import { Prop, Schema, SchemaFactory } from '@nestjs/mongoose';
@ObjectType()
@Schema()
export class User {
// We are using the @Field() decorator in addition to the @Prop() one to specify that the class propery is a GraphQL field
// In other words, that decorator isn't necessary for Rest APIs
@Field(() => String)
_id: MongooSchema.Types.ObjectId;
// Add user properties
@Field(() => String)
@Prop()
name: string;
@Field(() => String)
@Prop({ unique: true })
email: string;
@Field(() => String)
@Prop()
password: string;
@Field(() => String)
@Prop()
address: string;
// TODO: ADD RELATIONSHIP TO THE BOOK MODEL
}
export type UserDocument = User & Document;
export const UserSchema = SchemaFactory.createForClass(User);According to the
@nest/mongoosedocumentation, we use the@Prop()decorator to define fields in a data module. This decorator can take several properties, such as whether a field is required or unique. For example, we set the email field as unique to prevent duplicate accounts. We will explore other properties later on. You can learn more about them by visiting the documentation.In addition to the necessary
@Propdecorator, we also have the@Field()decorator from@nest/graphql. This will help generate our schema file and indicate to our API that the specific field is a GraphQL one.Now, let's update our DTO files. They are similar to the
entityfiles, but since they're not MongoDB fields, we don't use@Propsdecorators. 🛠️ Let's update the DTO files to look like the following: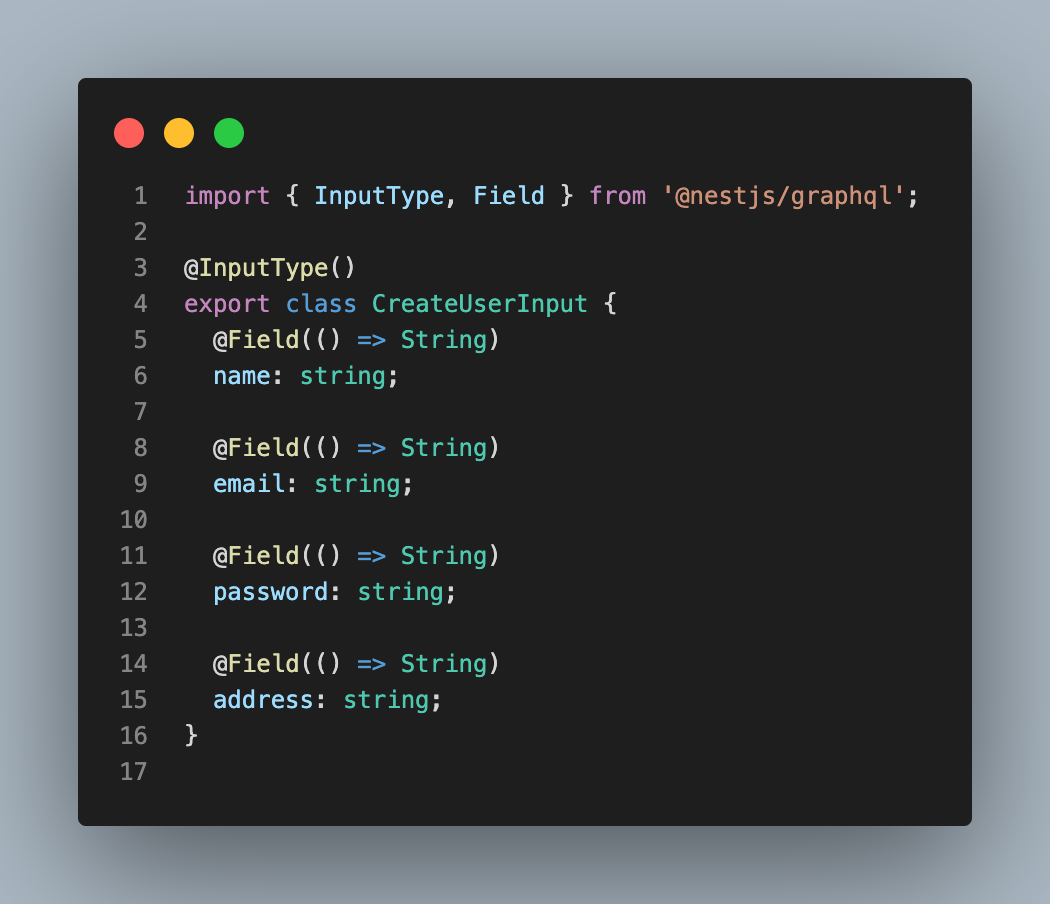
image4 - create-user dto
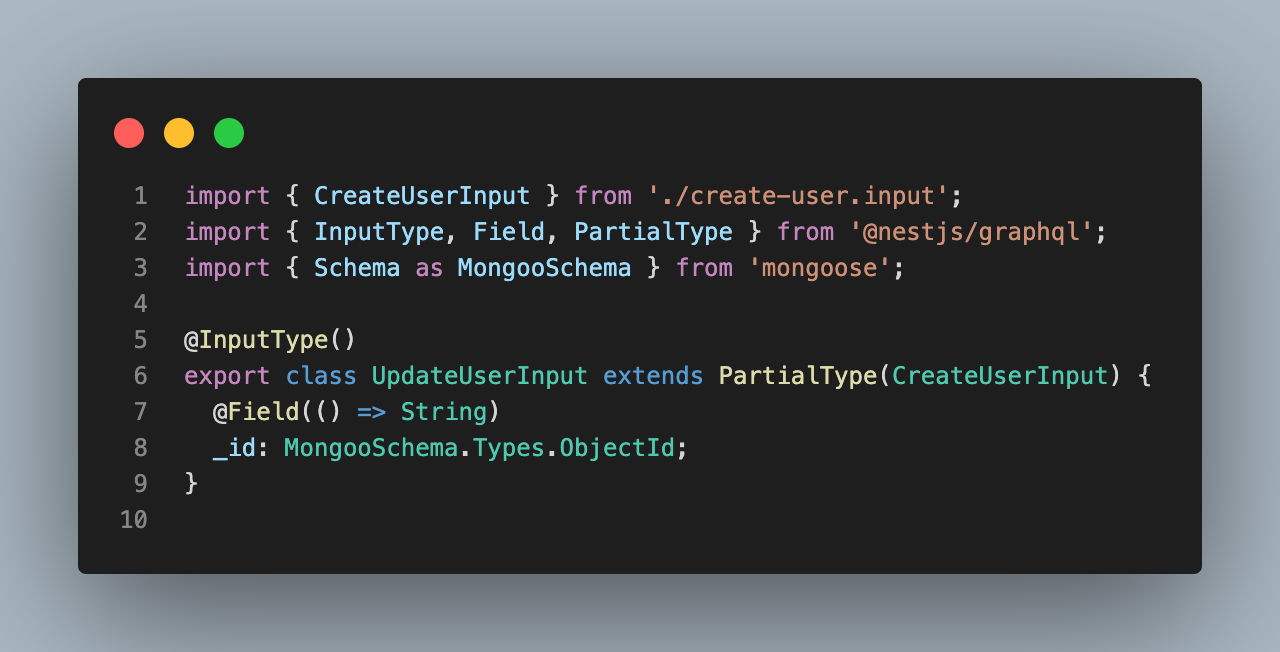
image5 - update-user dto
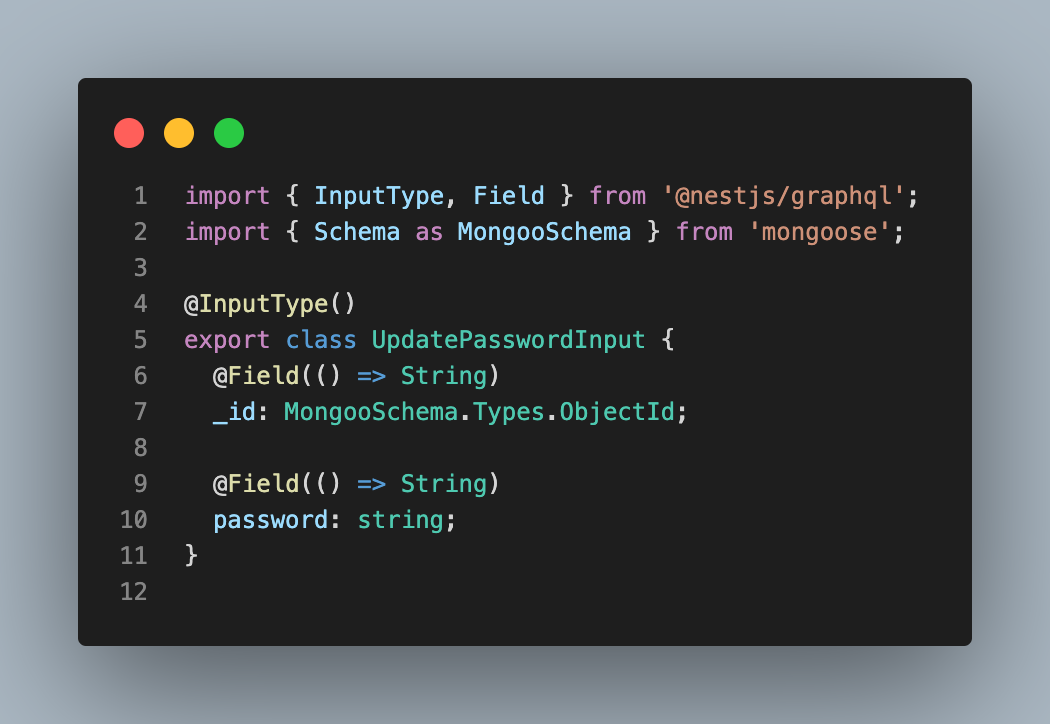
image6 - update-password dto
As we are on DTOs, I have added the last one, which will take care of updatePassword inputs. We are using
PartialTypefrom@nestjs/graphqlinto theUpdateUserInputclass to make sure all the fields that the CreateUserInput contains will be available here, but optional, you can read more about Partial utility types, a typescript feature here.Are you ready for some serious code-slinging action? We're about to dive into the nitty-gritty of business logic and, let's be real, it's not rocket science. Most of this stuff is inspired by the
@nestjs/mongoosedocumentation, so if you're ever feeling lost, just give it a quick peek. But don't worry, with everything we've covered so far, you've got this in the bag.🛠️ Now, let’s together update the
user.service.tsanduser.resolver.tsfiles like following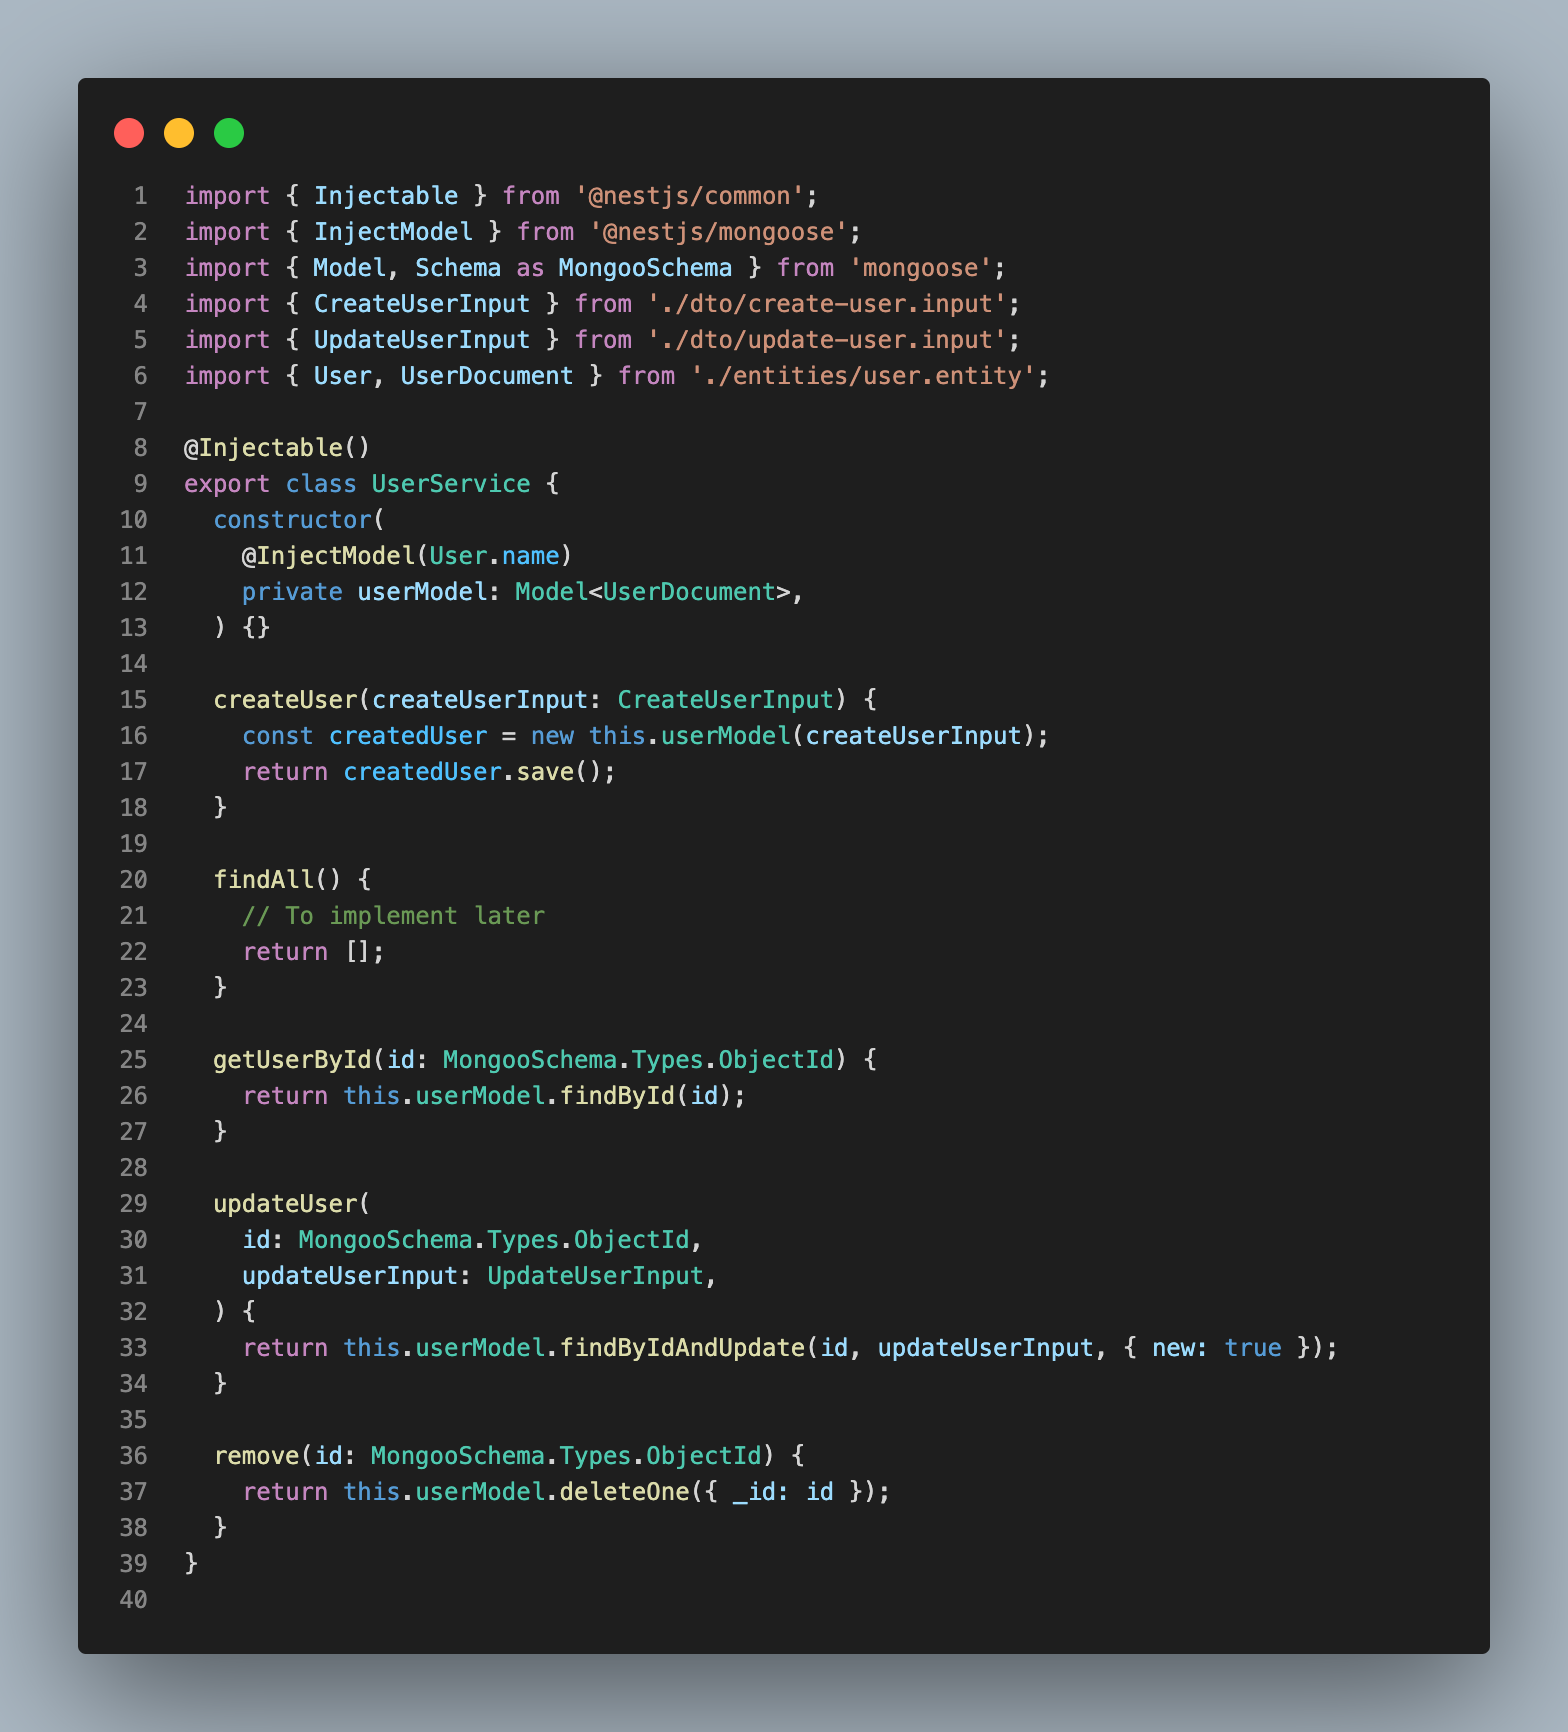
image7 - user.service updated
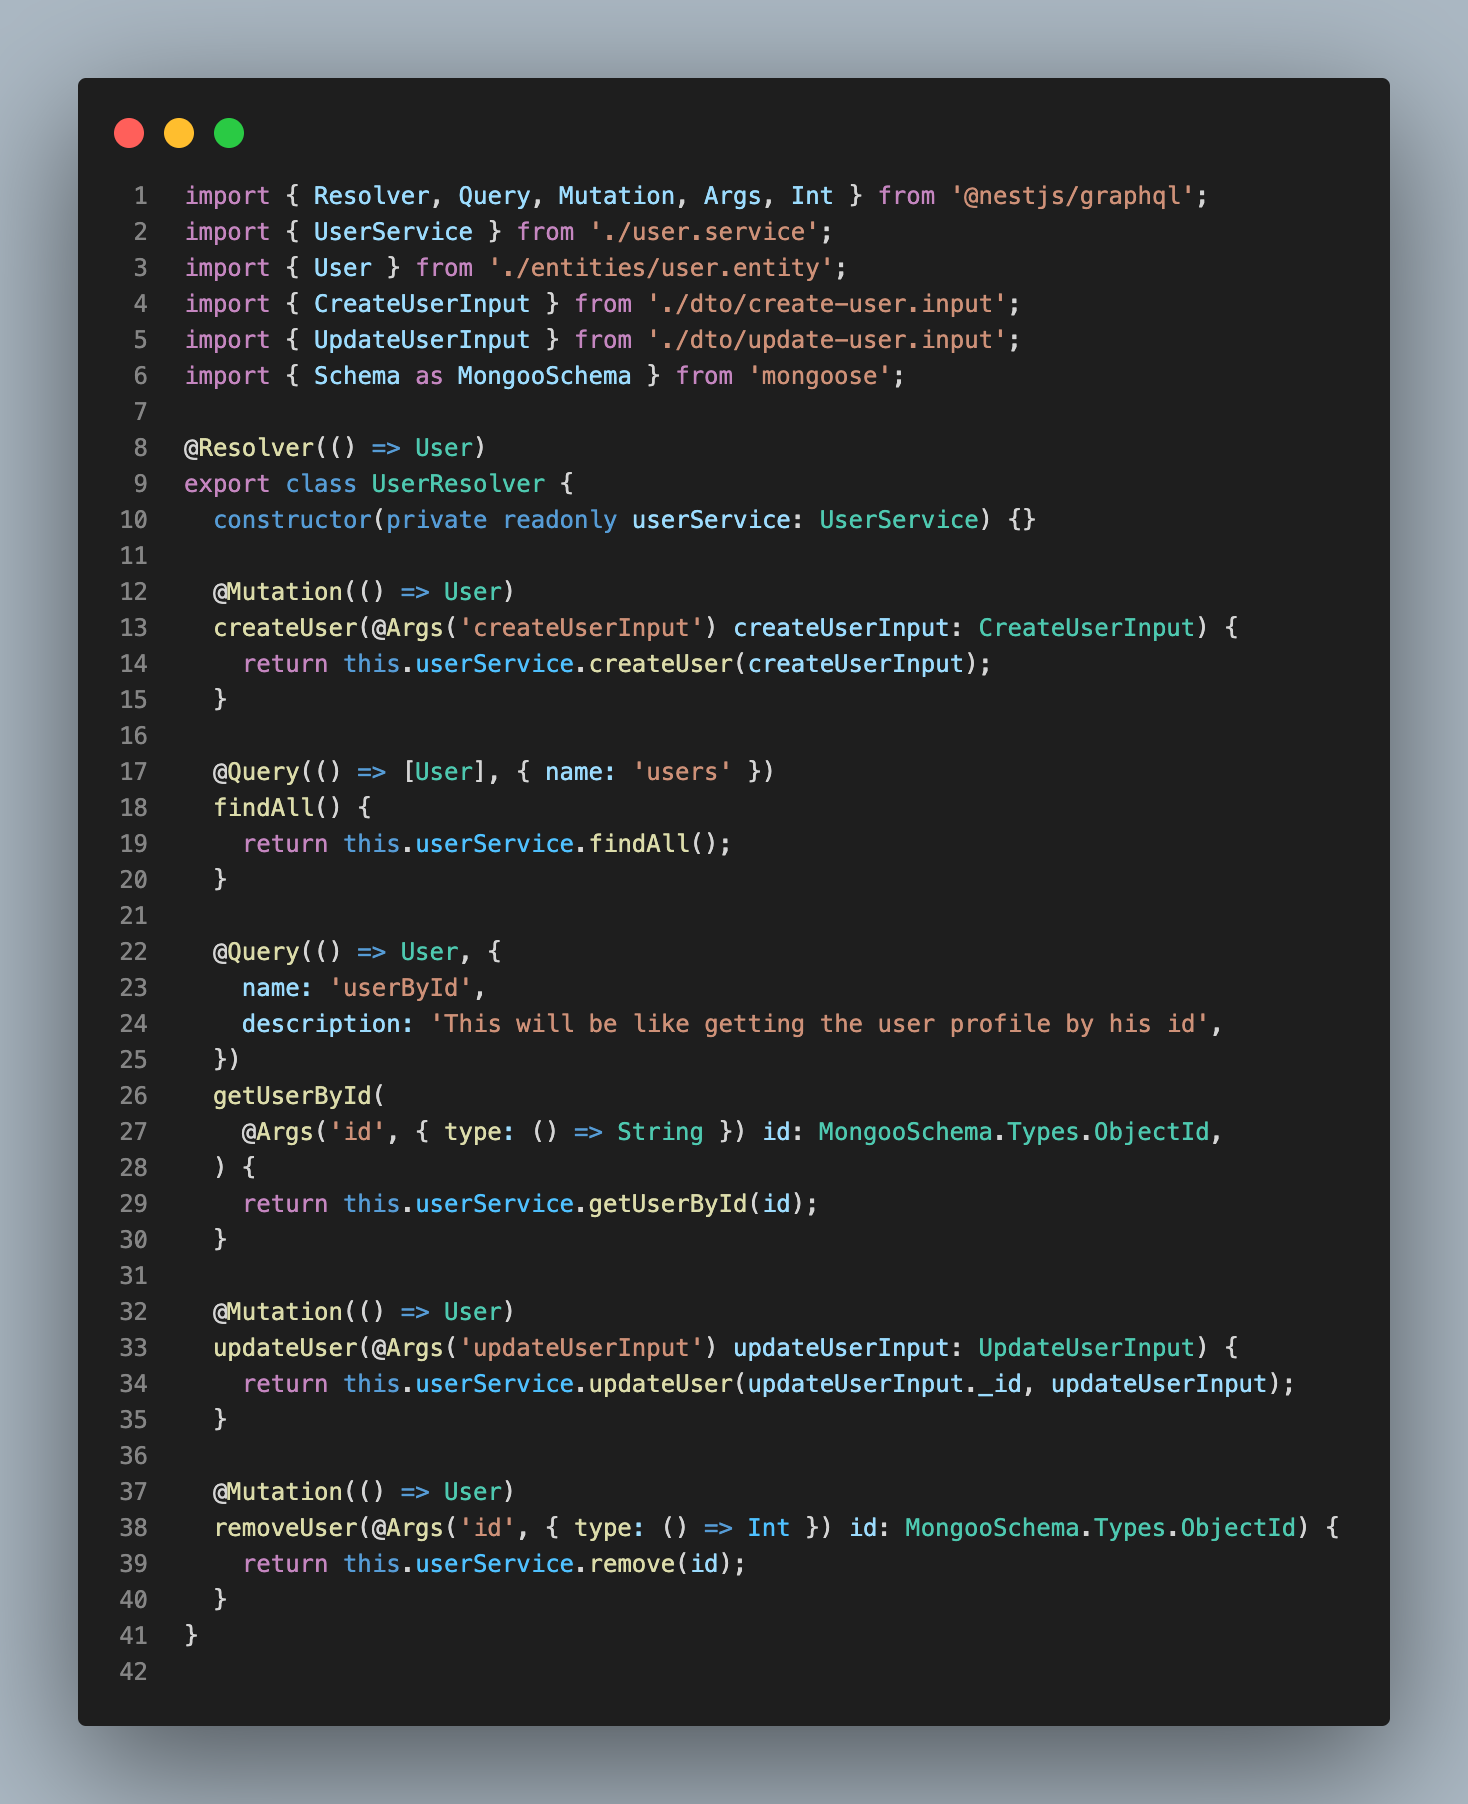
image8 - user-resolver.ts updated
Alright, folks, it's getting spicy now that we have more than one mutation and query. But don't worry, the code may look like gibberish but it's actually quite simple. Just pay attention to a couple of details, like making sure your custom
nameproperties are unique, otherwise, GraphQL will ignore the first one and you'll end up with a bunch of confused developers.And if things still seem a little murky, don't hesitate to add some helpful descriptions to your resolvers. Trust me, it'll make things much clearer for everyone.
🛠️ Update our
user.modulefile to reflect these changes and make sure we're injecting the user model and exporting it to the root module. Give it a shot, you got this! 🤘 You can check out#c4acf4to verify.After running the app once again, make sure everything is working just perfectly, the generated
schema.gqlshould look like the following: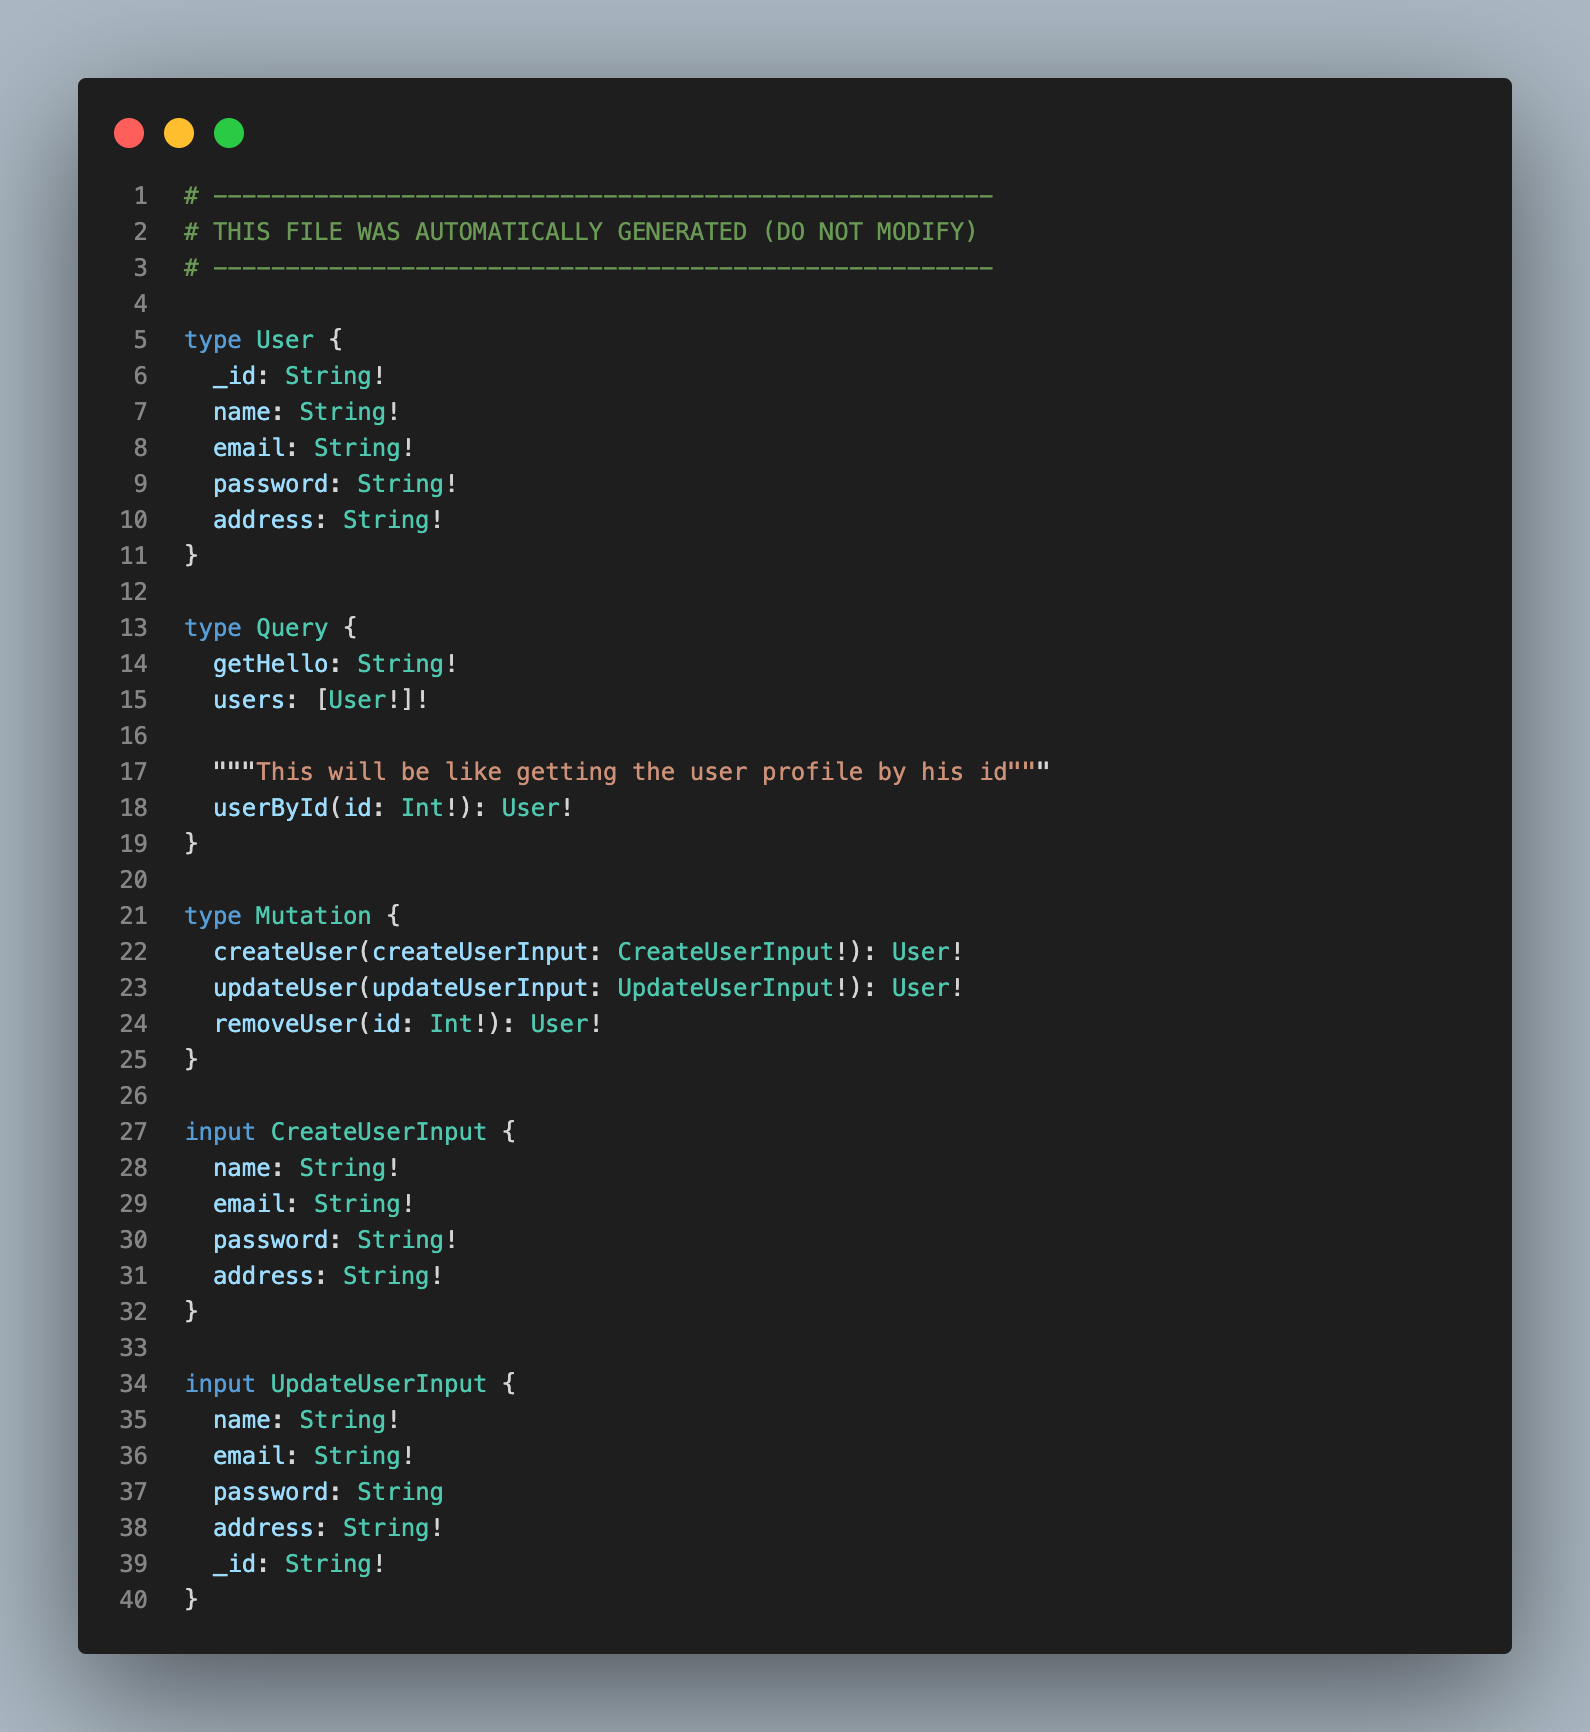
image9 - schema.gql file
Let’s try it out and create a first user
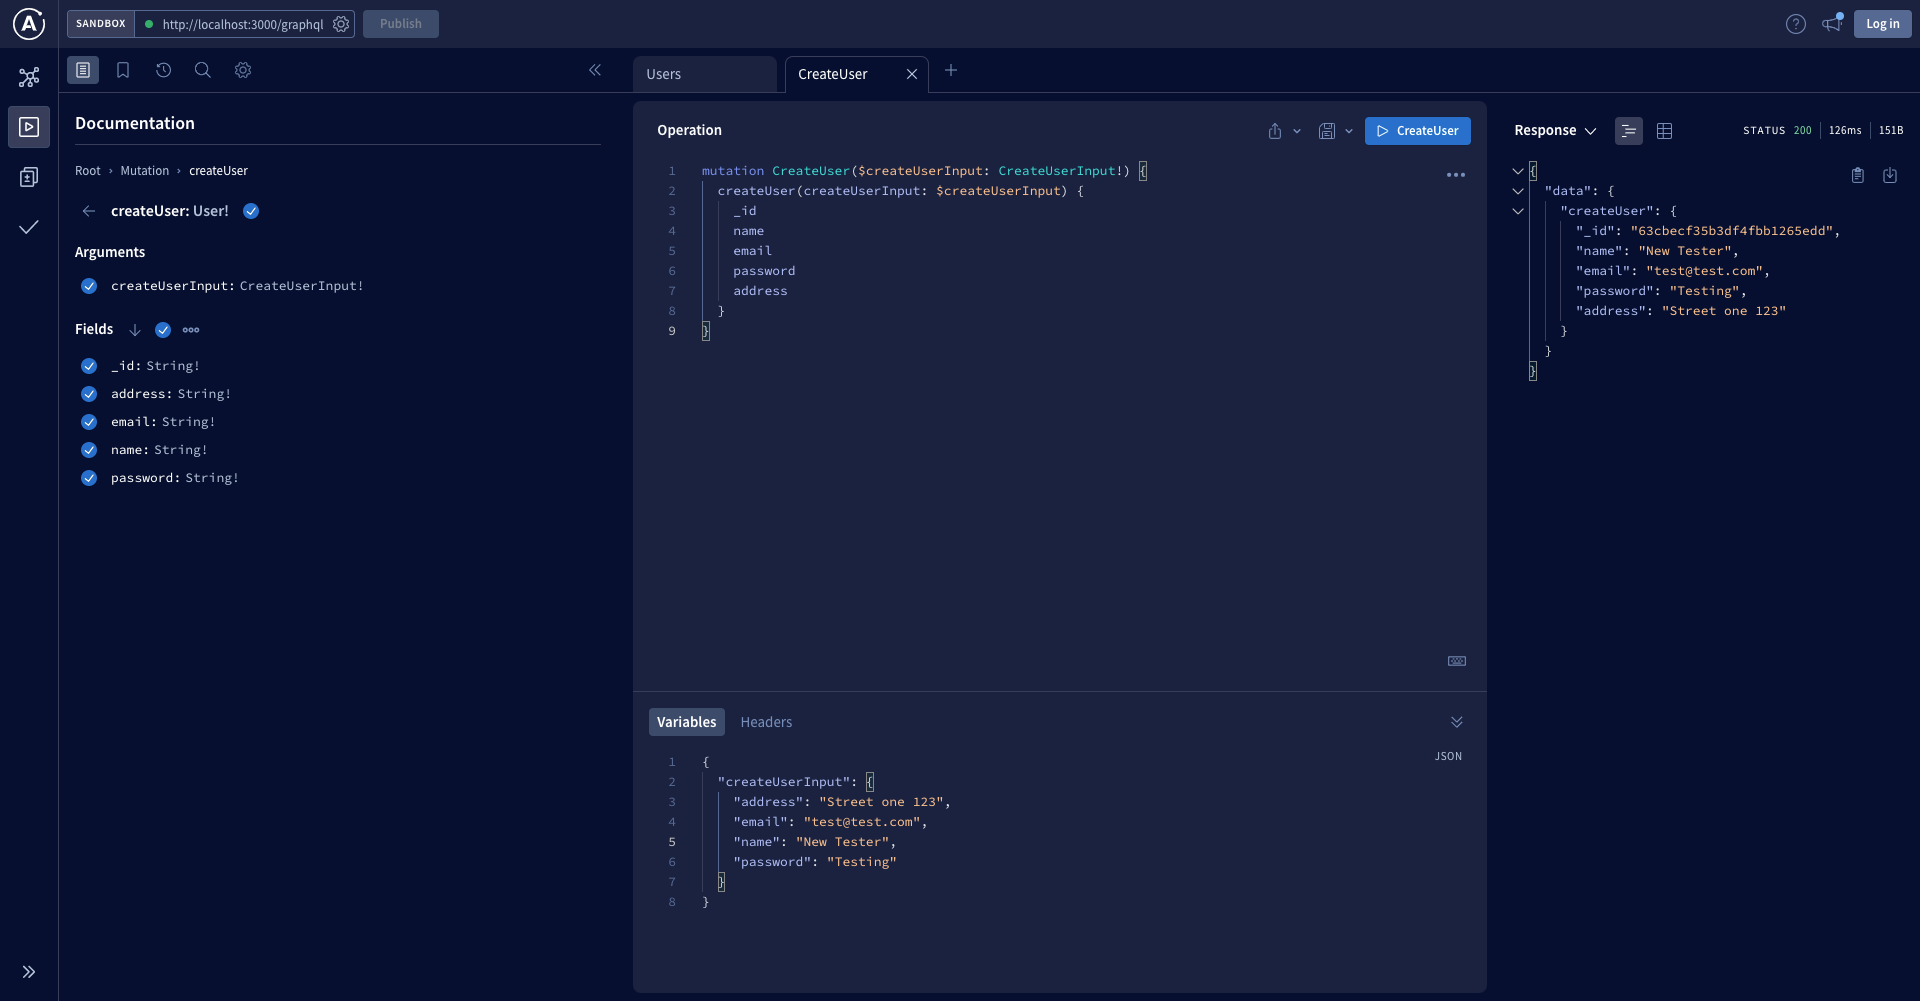
image10 - Create user mutation
You should be able to make all the CRUD operations, I know a password should never be stored the way we are doing, be patient, and the section after will all be about security.
Before we move forward to the security section, let’s do the same for book and author modules.
First, let’s generate the resources using nest CLI
# From the root of the project, let's run
$ cd src/app && nest g resource book && nest g resource author
This also does the exact same thing we saw before.
Alright, it's time to spruce up our DTOs, entities, services, and modules. Take a gander at
#20d186to see the shiny new structure we've got going on. And don't worry if it all seems a bit confusing at first, just take a break and try replicating it yourself. Because as they say, practice makes perfect... or at least passable 😎.However, it’s important to talk about few aspect we customized:
I have added a
commonmodule atapp/common/with only dto files, the aim of that module is to have shared logic undercommon/serviceand export them through its root module. For those dto, let’s briefly talk about theget-paginated.args.tsfile As we may have a lot of books, authors, or user, theirfindAllmethods under their respective services need to send paginated data, we have defined arguments responsible for calling those resources as following.
image11 - get-paginated.args.ts file
As you can see here, instead of calling limit and skip everywhere we have paginated queries, we decided to put it in a single place, then call the `GetPaginatedArgs` as query’s argument, you can see a sample of place it’s used in the `book.resolver.ts` file:

image12 - GetPaginatedArgsThe query we have above sends a response of type
GetBooksPaginatedResponsefor this specific query, we need to return a list ofargs.limit(by default the limit is 10) books but also we need to know how many books we have in the book collection, this is so helpful for the frontend team to build their pagination component, let’s now see what we have for in our books.service.ts file: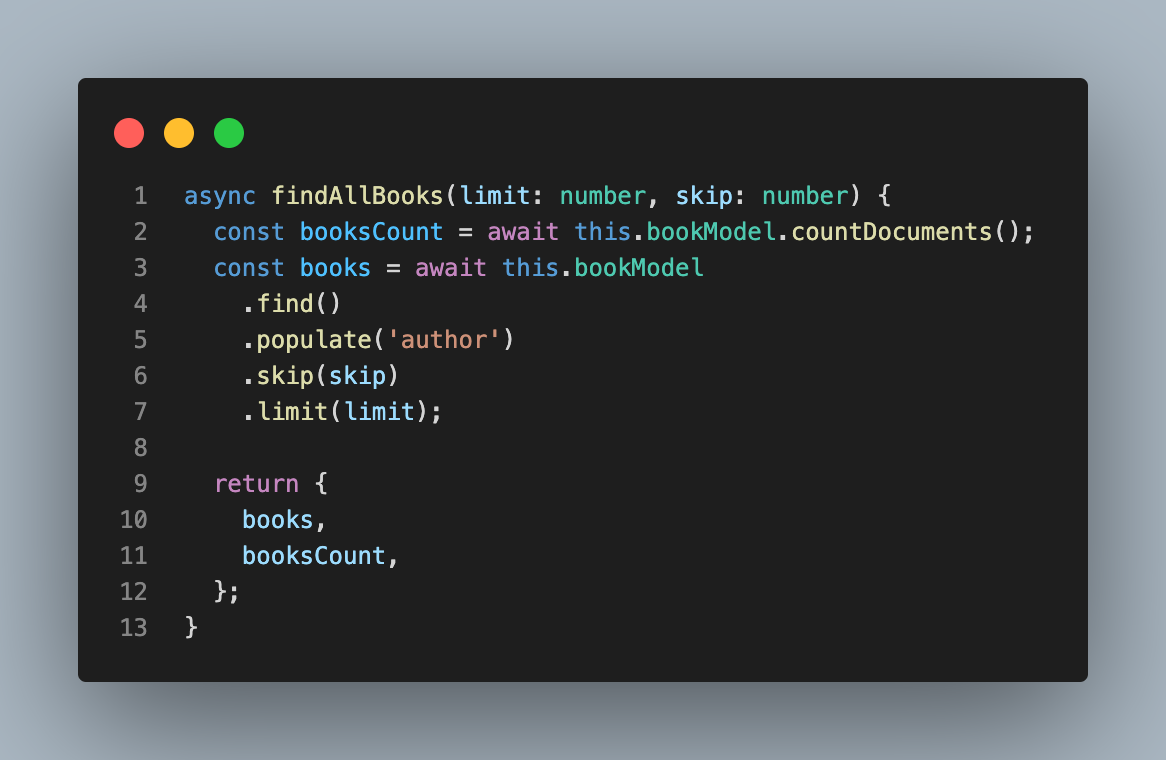
image13 - findAllBooks method
You can notice that we are sending a response of type
GetBooksPaginatedResponsedefined in thebook/entity/book.entity.tsfile.Get ready to dive into the exciting world of relationships! We're going to take a closer look at how we've defined the many-to-many relationship between our user and book models. When a user purchases a book, they become a reader for that book and that book becomes part of the user's collection. It's like magic! See the code below and get ready to amaze yourself. If you want to learn more about relationships in
@nest/mongoose, check out the documentation here, it's totally worth the read!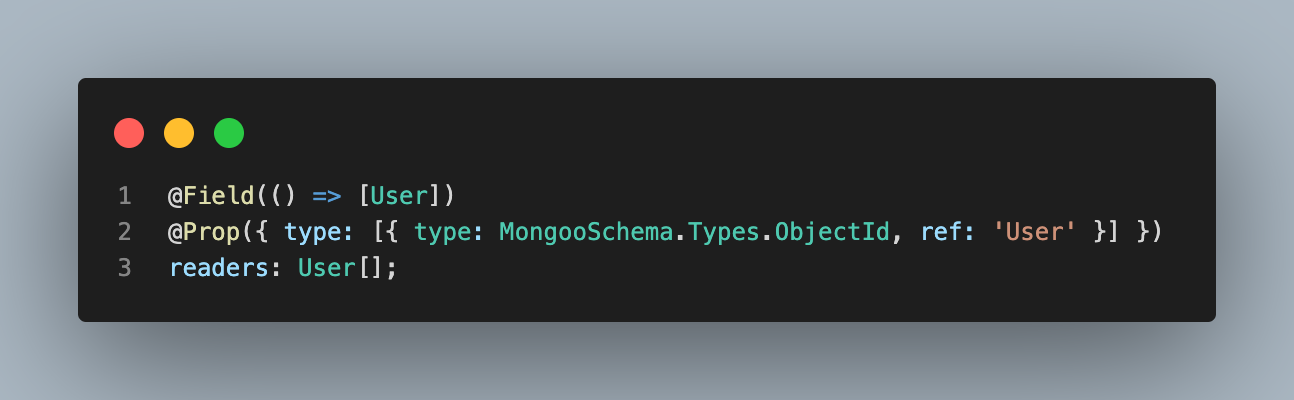
book.entity.ts
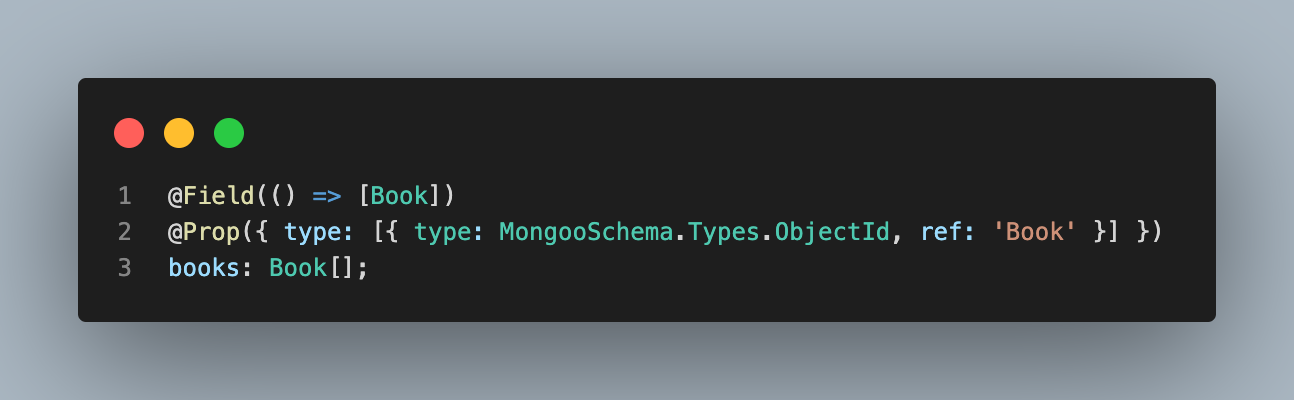 image14 - Book - User many-to-many relationship
user.entity.ts
image14 - Book - User many-to-many relationship
image14 - Book - User many-to-many relationship
user.entity.ts
image14 - Book - User many-to-many relationship
Amazing, we have done a lot so far, using a replication of the code we have at
#20d18, restart the server once again and make sure it runs correctly.Congrats, our API is growing and we can be proud of ourselves 🤩